instead of printing it off just use this blank thing that way you dont have to scan it or anything
so fill that out by pasting it in any art program and whatnot
then save it and upload it to that site
and itll give you an option to download it
so do that and then install it BAM
I JUST GOT THIS ON MY TABLET IT’S SO COOL OH MY GOD
for some reason it refused to recognize the third page of my letters but they were all pretty unnecessary mathematic things anyway so I’m not too worried. still something to keep in mind though, I hope it doesn’t happen for you!
paintfont.com would be a good place to go to quickly make a custom font for your comic!
ehh
It looks just as horrible in real life..even worse with the letter attached…
I’ll try this later.
you can also use alternative alphabets
Welp. Guess I know what font I’m gonna be using for comics from now on. B)
Welp. Looks like I have to do this now. So I can use this for Tengri’s asks.
For some reason there is no apostrophe in my set, but it still looks cool.
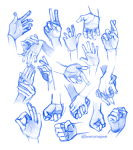
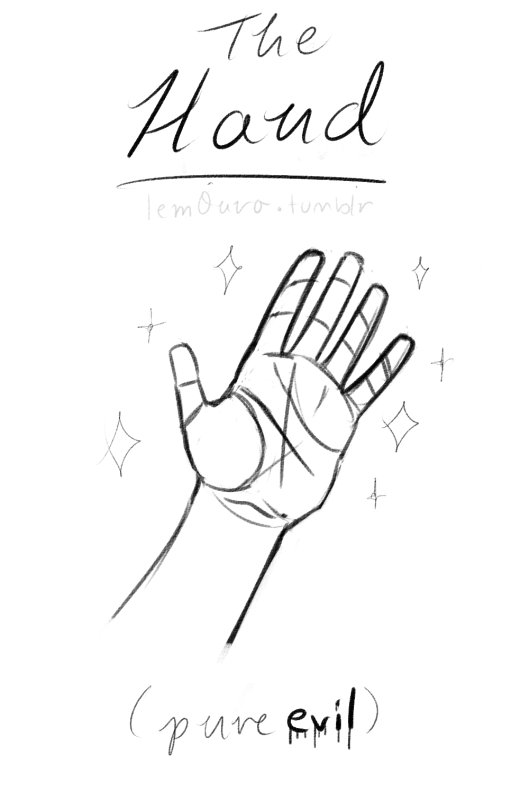
omg dont be ashamed at all!! Hands are generally tough to get used to, lots of artists struggle with it! so dont be ashamed i feel you.
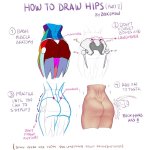
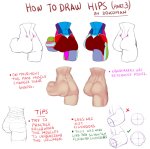
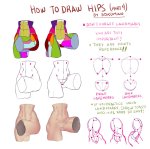
and I actually have made a hand anatomy guide before in fact! If you want to get better at drawing hands I def recommend you learn the basic anatomy first. Please check out the ones I made, I try to make it simple and easy to understand:
There’s my guide to the anatomy, but here’s some more tips that I’ve noted to myself that I’d like to include
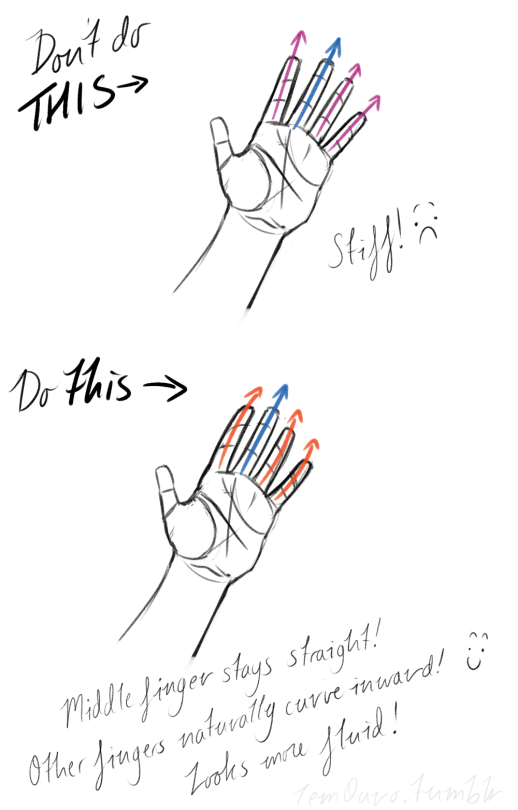
First off, I’d like to just note on the fingers: if you pay close attention to your own hand, you may notice the fingers are ever ever so slightly curved inward. It’s a very subtle detail, but I noticed that, despite how slight it is, it can make a hand look more lively, and less stiff.
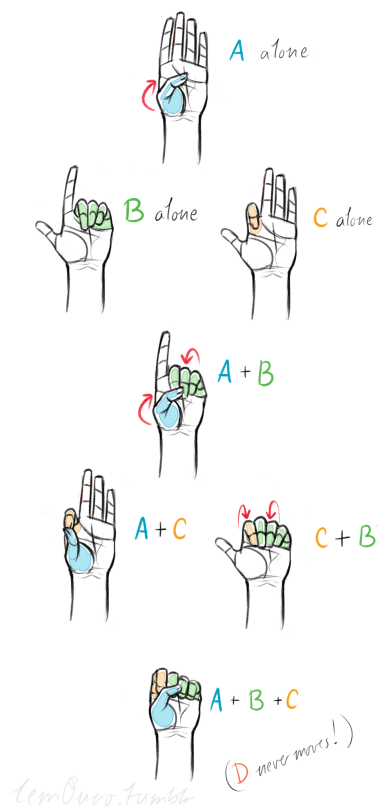
Second, the “M” on the palm! Your hand moves in many ways, and because it does it creates creases in your hand. The most prominent creases appear to make an M shape; this is handy to remember for what I’m going to talk about next. (It also could be a “W” I guess, or to be more specific a “ )X( “; just think of it in whatever way helps you remember!)
SO now that you see the M, draw your hand as a basic blocked shape and add your details. As you do, you can see that the M divides the palm into four basic parts!
When the hand moves, parts A, B, or C of the palm, alone or in different combos, will create the general poses that the hands do normally. These parts are the parts that move, with D being stationary, no matter what!
Here’s a chart of all the possible combos. Once you have down what part of the hand moves for a certain pose, you can change up the fingers and tweak it a bit to do what you need to make it more specific!
This is simply my method of drawing hands. God knows there are hundreds of tutorials out there by other artists, but personally, this way helps me the best (after learning the anatomy first).
This way I can divide the hand and combine the parts in any such way I need!
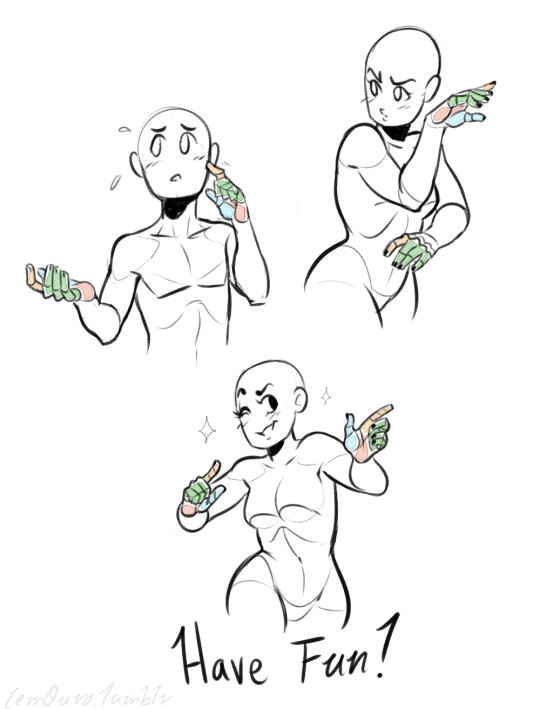
Hands take a lot of effort to grapple, and you need to practice them a lot, especially foreshortening of the hand; that’s really something you need to learn through your own studies. Look at your own hands, draw hands from life, from magazines, shows, comics; just draw hands! You’ll eventually figure out a method that works best for you. So to get better at drawing hands; draw hands!! And don’t stress over it, have fun with it!
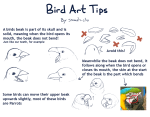
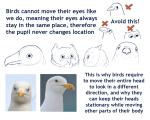
Couple of tips on some bird things for art! Some which people rarely touch on in their own tutorials or tips, mostly the first and second one! If there’s any specific things you’d like some tips on just let me know with an ask~


